 So, back to the start. I couldn't find a small 5k trimmer like the one used by Charles and I wasn't willing to wait a few days to order one. So, I dug and dug and found an old-style dial-type potentiometer and used jumper wires to wire it into the circuit. This turned out to be a good decision as I was able to dial in more accurate resistances than with a screwdriver on the tiny tiny 10k trimmer.
My first (failed?) test with the 10k trimmer was tracked in my Maker's Notebook with a pen. For the updated test with the new 5k, I switched to an Excel spreadsheet so I could let it do the calculations for me. What was great was that my data was coming in pretty close to Charles' data seen in the chart on page 78. My "op-amp output relative to A voltage divider" data was looking matching up closely.
 Now, here's where I think I made my initial mistake. This last part of Chapter 11 is broken into four phases, and I felt good about my results (for the 10k) for Phase 1, but in Phase 2 you start calculating some specific voltage values and such... and on Step 7 is where I got in trouble. My values for Vi (Voltage Differential) were not only larger than Charles' values, but they were flipped. I was getting negative values for the third column (for those of you following along in the book and the chart on page 78) where Charles had positive values and vice-versa. Needless to say, this will most definitely affect the line graph you'll be making for Phase 3. I scrapped it all at that point, figuring I'd done something wrong... and then went on the hunt for the 5k potentiometer. (I'm getting to my error... just stay with me a bit longer.)
Okay, with the 5k, I was able to increment the potentiometer in 250 ohm steps... dialing in was easy with the larger dial on the 5k. (Because I was originally using the 10k, I made my jumps in 1000ohm steps instead of the 250ohm Charles used.)
Phase 1 will have you setting the potentiometer to a variety of values between 1500 and 3750ohms in 250 ohm increments. This means you'll be making 10 readings of the Op-am output voltage (relative to point A in Figure 11.4). The data I collected is shown below:

This concluded the data collection for Phase 1.
For Phase 2, I needed to take measurements of the full resistance offered by the 5k pot as well as the two matching 100k resistors that would be labeled Rl and Rr (left and right, respectively, depending on their position relative to the 5k's connections on the breadboard). I also needed to take the full voltage available from my power supply -- Vcc = 9190 millivolts.
Carefully read and understand how the R1 and R2 values are calculated for the circuit. It all hangs on the resistance dialed in to the 5K plus the full values of the Rl and Rr resistors. The equations for R1 and R2 can be found on page 80, and here's the data from my spreadsheet for those two values with respect to the dialed in resistance of the 5k:

Using R1 and R2 values along with Vcc, Step 6 will have you calculating Vm (voltage at center of voltage divider) using another formula on page 80. Here's my updated spreadsheet with that value:

Finally, to move on to Phase 3 and the required graphs, you need to calculate what's called the Voltage Differential, and this is where I got into trouble on my first run with the 10k potentiometer. The formula is fairly straightforward, and I just created it in the spreadsheet and got the following values:

I re-read Step 7 for Phase 2 and there it was -- "Just divide Vcc by 2, then subtract Vm, and that's the difference between he two inputs. It is properly called the voltage differential, and should be a negative number, so remember to include the minus sign."
Derp. Multiplying all the results in column F by -1 fixed the issue. This isn't an error in the book, but just a misunderstanding in viewing the data. Some of my values WERE negative in value, so I figured only those negative values were related to the voltage differential. Wrong. (What's probably needed is simply putting a -1* in front of the Vi equation.)
After figuring that issue out, my 10k data maybe DOES make sense. But at this point I was deep enough into the 5k test to keep going. Below you'll find my final spreadsheet:

Now on to Phase 3 and graphing the data. Page 81 shows two different graphs. One is taking the first column for horizontal and second column for vertical. The other graph uses first column against sixth column (F in my image above). Here's what I came up with...
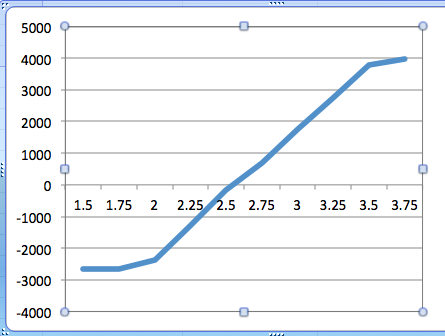

Pretty close to straight lines, huh? The first graph has those irregular ends but most of the line does follow a fairly straight path, so I'm going to run with it... Charles also strips out only the straight portion of his data.
Now to calculate the gain for Phase 4. I'll use from 2 volts to 3.5 volts as my two sections to use for calculating the slope.
Slope = rise over run or V / H. Because both charts are using the 1.5 to 3.75 volts range for the horizontal, the runs for both graphs will cancel out, leaving me Gain = V1/V2.
V1 = 6149 (3770 + 2379)
V2 = 67.6 (44.59+22.97)
Gain = 6149 / 67.6 = 91.05
Let's just round that to 90. Hey, that matches what Charles' got! Be sure to read the section on page 82 and understand how Charles checked his math with the original resistor values! The theoretical Gain should be about 100, but hey... I'll take 90! Remember... components aren't always exactly what you measure!
Finally grasping how this little circuit works is a good feeling. It also made the final section in Chapter 11 more enjoyable as Charles explains these very simple op-amp circuit schematics that all of a sudden just make sense.
Closing out Chapter 11, Figure 11-15 is just cool. A voltage split using a 9V battery. I've often wondered how folks made those little 9V battery-powered amplifiers for headphone jacks and such, and now I know. And understand! I even have all the components to make one if I should choose to do so.
Up next is Chapter 12, but that's going to have to wait a week. As I stated in an earlier post, I'll be taking next week off to spend with my two boys before they start school. If I find time in the evenings to tackle Experiment 12, I'll do it... but probably not :)
Back soon...
No comments:
Post a Comment